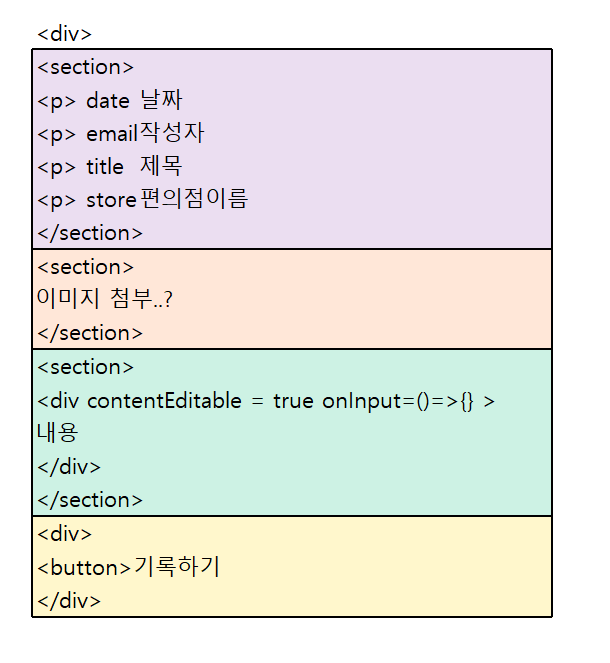
사용한 component
1) InputformLayout.jsx : 메인페이지 레이아웃 > 모달팝업 실행
2) Modal.jsx : 모달 팝업
3) Inputform.jsx : 모달팝업 내부의 데이터 내용
Div태그 contentEditable
: 속성을 true를 사용시 글 + 이미지 작성 가능
1. InputformLayout.jsx : 메인페이지 레이아웃 > 모달팝업 실행
import React, { useState } from 'react';
import Modal from 'components/UI/Modal';
import styled from 'styled-components';
function InputformLayout() {
const [modalOpen, setModalOpen] = useState(false);
const showModal = () => {
setModalOpen(true);
};
return (
<>
<Button onClick={showModal}>
<div> 새 글 작성시 여기를 클릭하세요!</div>
</Button>
{modalOpen && <Modal setModalOpen={setModalOpen} setData={setData} />}
</>
);
}
const Button = styled.button`
width: 400px;
background-color: transparent;
cursor: pointer;
border: 1px solid black;
margin: 20px;
&:hover {
//box-shadow: rgba(0, 0, 0, 0) 0px 0px 0px 0px;
}
`;
const ResultDiv = styled.div`
padding: 10px;
border: 1px solid blue;
margin: 10px;
`;
export default InputformLayout;
1) 버튼 클릭하면 모달 팝업 열리기 ( showModal )
- modalOpen값을 false에서 true로 상태 변경
2) modalOpen && <Modal setModalOpen={setModalOpen} setData={setData} />
- modalOpen 값이 true이고 <Modal> 컴포넌트 호출 : 필요 데이터는 props로 전달
3) styled-components' 사용
2. Modal.jsx : 모달 팝업
import React from 'react';
import styled from 'styled-components';
import Inputform from './Inputform';
function Modal({ setModalOpen, setData }) {
const closeModal = () => {
setModalOpen(false);
};
return (
<BackGround>
<Container>
<Button onClick={closeModal}>닫기</Button>
<Inputform setData={setData} />
</Container>
</BackGround>
);
}
const BackGround = styled.div`
background-color: rgba(0, 0, 0, 0.7);
z-index: 10;
position: fixed;
width: 100%;
height: 1000px;
top: 0;
`;
const Container = styled.div`
width: 700px;
height: 700px;
border: 1px solid black;
/*최상단 위치 */
z-index: 100;
/*중앙배치 */
/*translate:본인 사이즈 기준 */
position: absolute;
top: 50%;
left: 50%;
transform: translate(-50%, -50%);
background-color: white;
`;
const Button = styled.button`
position: absolute;
right: 10px;
top: 10px;
`;
export default Modal;
1) 모달팝업되고 나서, 팝업 제외한 부분 = <BackGround>
2) 모달팝업 부분 = Container
- modal 창이 최상위에 노출되도록 "z-index" : 높게 설정 / position: absolute
- [닫기]버튼 클릭하면 state로 값 변경 (false)
- <Inputform> : 팝업 내용 props로 필요 데이터 전달 & 호출
3. Inputform.jsx : 모달팝업 내부의 데이터 내용
import React, { useState } from 'react';
import styled from 'styled-components';
function Inputform({ setData }) {
const [title, setTitle] = useState('');
const [content, setContent] = useState('');
return (
<>
<form
onSubmit={async (event) => {
event.preventDefault();
const newData = {
email: 'test',
content,
store: null,
date: new Date(),
title,
image_url: null
};
setData((prev) => [newData, ...prev]);
}}
>
<StSection>
<div>
<p>날짜</p>
</div>
<p>작성자</p>
<div>
<label>제목</label>
<input
value={title}
onChange={(event) => setTitle(event.target.value)}
placeholder="최대 20글자까지 작성가능합니다."
maxLength={20}
></input>
</div>
<div>
<label>편의점이름</label>
<select>
<option>CU</option>
<option>GS</option>
<option>이마트24</option>
<option>세븐일레븐</option>
</select>
</div>
</StSection>
<StSection>
<div>
<p>이미지 첨부</p>
<input type="file" ></input>
<button>업로드</button>
</div>
</StSection>
<StSection>
<p>내용</p>
<StContent
value={content}
contentEditable={true}
onInput={(event) => {
setContent(event.currentTarget.innerHTML);
}}
></StContent>
</StSection>
<BtnSection>
<button>등록하기</button>
</BtnSection>
</form>
</>
);
}
const StSection = styled.section`
padding: 10px;
margin: 10px;
`;
const StContent = styled.div`
min-height: 100px;
border: 1px solid black;
`;
const BtnSection = styled.div`
display: flex;
justify-content: flex-end;
padding-right: 20px;
`;
export default Inputform;
1) 아래처럼 어떻게 만들지 구상하고 코드 작성하기
[고민]
1. Input과 Textarea : 불가능
▶ 글 작성시 text는 가능하지만 이미지 넣기는 불가능
2. Div태그의 contentEditable 속성 사용
<div
value={content}
contentEditable={true}
onInput={(event) => {
setContent(event.currentTarget.innerHTML);
}}
>
▶ contentEditable속성을 true를 사용시 글 + 이미지 작성 가능
▶ input과 textarea 태그는 onChange 이벤트를 사용하지만, contentEditable 속성은 onInput 이벤트를 사용해야함.
3. 글만 가져오고 그림은 못 가져옴
(기존) event.currentTarget.textContent : 글만 가져옴
(변경) event.currentTarget.innerHTML: <img>와 <div>로해서 데이터 확인 가능

▶ DOMParser 사용 : string > DOM Element로 반환하기
- 글에 사진을 넣을 것인지 조금 더 생각해보고 반영해야할 것 같음!
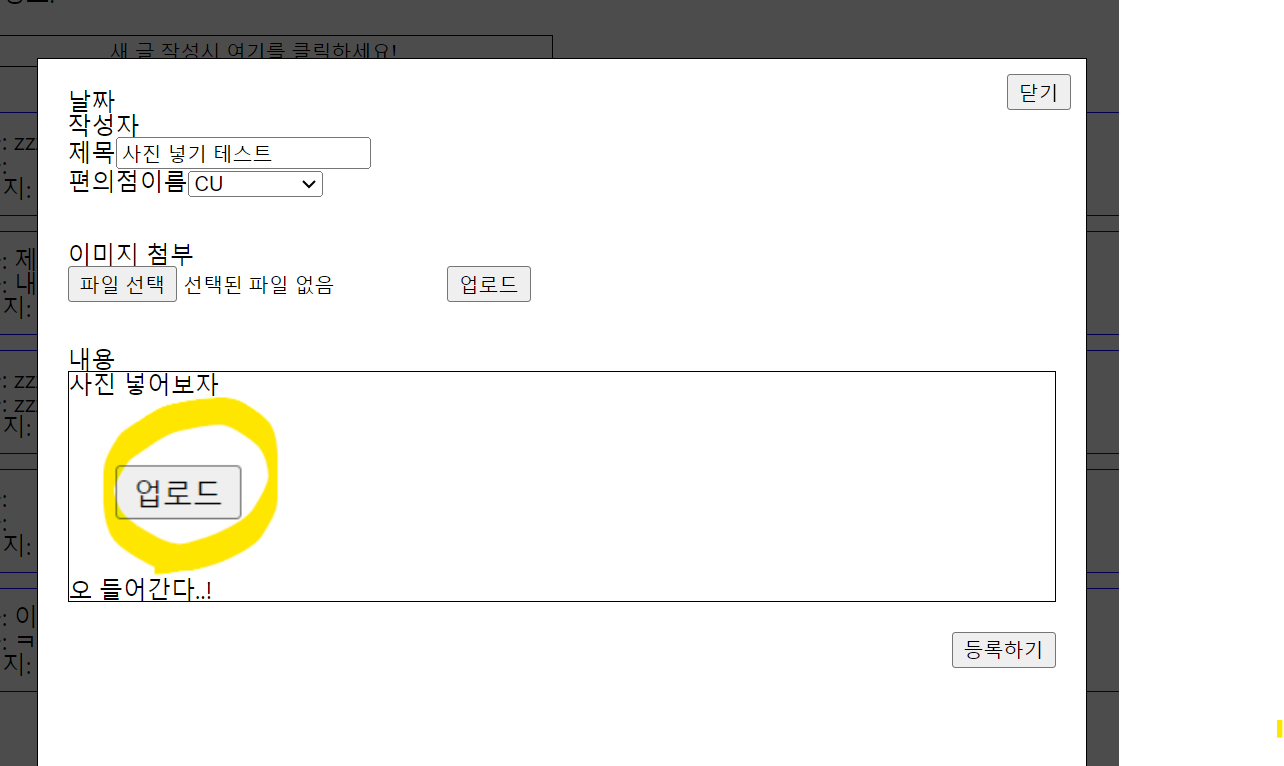
- 우선 사진도 들어감!
끝.